How to create an Amazon storefront? [2026 guide]
Step-by-step guide on how to create an Amazon storefront in 2026, with Brand Registry rules, Store Builder templates, and more.

Updated: May 2026
You have a private label brand. Your product listings convert. Your reviews are stable. But every time a shopper lands on one of your detail pages, they see your hero image surrounded with competitor ads, “frequently bought together” carousels suggesting alternatives, and a sponsored placement above your title.
The customer is in your store, and Amazon is showing them everyone else.
That gap is exactly what an Amazon storefront closes.
For sellers competing in saturated categories, and for ecommerce managers running brands across the DACH market where Amazon.de is the dominant marketplace, knowing how to create an Amazon storefront has stopped being a “nice to have.” It is the only place on Amazon where a shopper sees your products without a single competitor ad on the page.
It is also free for any brand-registered seller, mobile-optimized out of the box, and works across the desktop and mobile app experience without extra setup. This step-by-step guide walks through exactly how to create your storefront, who is eligible, which template to pick, and how to promote your storefront once it goes live.
You’ll learn
- What an Amazon storefront actually is and why a Brand Store differs from an Amazon influencer storefront
- The eligibility criteria and exact requirements to create an Amazon storefront in 2026
- How to register your brand in Amazon Brand Registry and avoid the most common rejection reasons
- How to access the Store Builder inside your Amazon Seller Central account
- How to select a template: Marquee, Product Grid, Product Highlight, or Blank
- How to set up a storefront page by page, with high-quality images, video, CTAs, and product pages
- How to preview your storefront on desktop and mobile before submitting it for review
- How long Amazon’s review takes and what to do when Amazon requests changes
- How to promote your storefront, drive traffic, and measure your store’s performance
- How an Amazon storefront fits with FBA, logistics in Germany, and your wider ecommerce strategy
What an Amazon storefront actually is
An Amazon storefront is a free, multi-page brand destination inside the Amazon store. Think of it as your mini-website with a custom URL, branded imagery, your own navigation, and product listings, but living entirely on Amazon’s domain.
There are no competitor ads, no sponsored placements from rivals, and no “people also bought” suggestions pulling shoppers away from your products.
That last detail is the entire point. A storefront lets you showcase your products in a focused environment, which directly helps build brand recognition with potential buyers who would otherwise be one click from a competitor.
Two distinct things share the same word “storefront” on Amazon, and confusing them is a costly first mistake.
A Brand Store is what most sellers on Amazon mean: a multi-page hub for a registered brand selling its own products, used to showcase your products and increase sales across the catalog.
An Amazon influencer storefront is something else entirely. It is a curated affiliate page where content creators recommend other people’s products and earn an affiliate link commission on resulting sales. The Amazon Influencer Program is part of Amazon Associates, runs on a separate eligibility model, and uses the URL format amazon.com/shop/yourname.
This guide is about the Brand Store route: how a brand owner creates an Amazon storefront for the products they actually sell on Amazon.
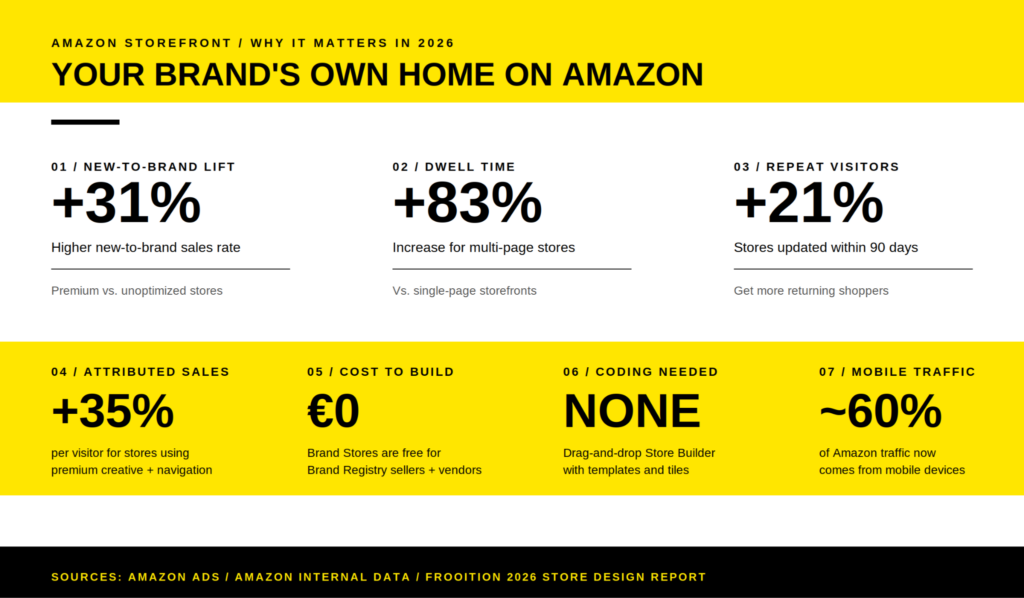
The numbers behind why brands are investing in this format are unambiguous. Stores updated within the last 90 days see roughly 21% more repeat visitors than stagnant stores. Multi-page stores see an 83% increase in dwell time compared to single-page layouts. Brands using premium creative and strategic navigation report a 35% increase in attributed sales per visitor, and stores using high-quality, narrative-driven design see a 31% higher new-to-brand sales rate versus those relying on basic templates.
Combined with enhanced brand content modules on the underlying product detail pages, a well-built storefront can lift conversion rates noticeably across an entire catalog. That makes it one of the few free assets on Amazon that materially helps you increase sales without paying for more traffic.
This is the same reason brands use storefronts to launch into new marketplaces. When a brand-registered seller decides to start selling on Amazon.de, the storefront is often the first asset they build before any paid promotion. Launching with a coherent brand environment makes every euro of advertising work harder.
For sellers operating in Germany, the second-largest Amazon marketplace globally with $45.9 billion in 2025 revenue, these lifts compound with lower CPC averages and less ad saturation than the U.S. market. If you need wider market context, this overview of Amazon in Germany is a useful starting point.
If you are already among the top online shops in Germany or trying to break into that league, a polished Amazon brand storefront does double duty. It works as a sales channel and as a credibility signal that mirrors the experience customers expect from Shopify-based DTC stores.
| Channel | Where it lives | Cost | Brand control | Best for |
| Amazon storefront | On amazon.com or amazon.de | Free for brand-registered sellers | Medium, within Amazon’s tile system | Reaching Amazon shoppers in a focused brand space |
| Shopify store | Your own domain | $39+/month plus theme or dev costs | Full control | Owning the customer relationship and data |
| Amazon product detail pages alone | On Amazon | Free | Low, fixed layout plus A+ Content | Default option if no Brand Registry yet |
| Amazon Posts | Inside Amazon shopping feeds | Free | Low, feed-style updates | Lightweight content alongside a storefront |
The pattern that works for established brands is using Shopify and the Amazon storefront as parallel channels. Shopify owns the customer relationship, the email list, and the data. The Amazon storefront captures the audience already searching on Amazon and converts them in their preferred environment. Each channel does what the other cannot.
That matters even more in the German ecommerce market, where shoppers expect clear information, reliable delivery, and recognizable trust signals before they buy from a new brand.
Eligibility criteria: who can create an Amazon storefront
Not everyone selling on Amazon can open an Amazon storefront. The requirements are tight and Amazon enforces them at the Brand Registry stage, which means you cannot work around them. Three things must be true before Amazon will let you make an Amazon storefront.
You must have a Professional seller account. The Individual selling plan ($0.99 per item) does not include access to the Store Builder. If you are still on the Individual plan, upgrade to Professional ($39.99 per month) inside Amazon Seller Central before continuing. Without it, the Stores tab simply will not appear in your menu.
You must own the brand or be authorized. That means you sell branded products under your own name, not someone else’s. Resellers, retail arbitrage operators, and unauthorized distributors are blocked at the Brand Registry stage. If you sell through dropshipping companies in Germany without owning the brand, you cannot create an Amazon storefront for those products. This is where the wider market barriers for selling online in Germany also matter, because brand ownership, documentation, and compliance are not optional extras.
You must have a registered or pending trademark. Amazon Brand Registry is the gate. The trademark must be a text-based mark, meaning a word mark, or an image-based mark with words, letters, or numbers. It must come from a recognized IP office: USPTO in the U.S., EUIPO for the European Union, DPMA for Germany, UKIPO for the UK, JPO for Japan, and several others. Pending trademark applications can qualify if they were filed through Amazon’s IP Accelerator program or with a supported office.
If you do not yet own a registered trademark, the trademark process itself takes 6-12 months in most jurisdictions and costs €700-€1,500 in EU classes or $225-$400 per USPTO class in the U.S. before legal fees. The Amazon IP Accelerator route, which connects you with vetted IP firms, gives you faster access to Brand Registry while your trademark application is pending, but it does not skip the underlying timeline.
Plan accordingly. Most brands need 4-12 weeks from “we want a Storefront” to “Storefront live,” and the bottleneck is almost never the build itself.
| Eligibility check | Required for storefront? | Notes |
| Professional Seller account | Yes | $39.99/month, upgradeable from Individual at any time |
| Active Amazon seller account in good standing | Yes | Suspended or under-investigation accounts are blocked |
| Registered or pending trademark | Yes | Pending applications accepted through IP Accelerator |
| Logo permanently affixed to product or packaging | Yes | Removable stickers and temporary labels are not accepted |
| Brand name matches trademark exactly | Yes | Spelling and styling must align |
| Existing product listings on Amazon | Recommended | Storefront pulls live ASINs |
| Social media following | No | That is for the Amazon Influencer Program |
| Specific revenue or review threshold | No | No minimum sales or feedback gate |
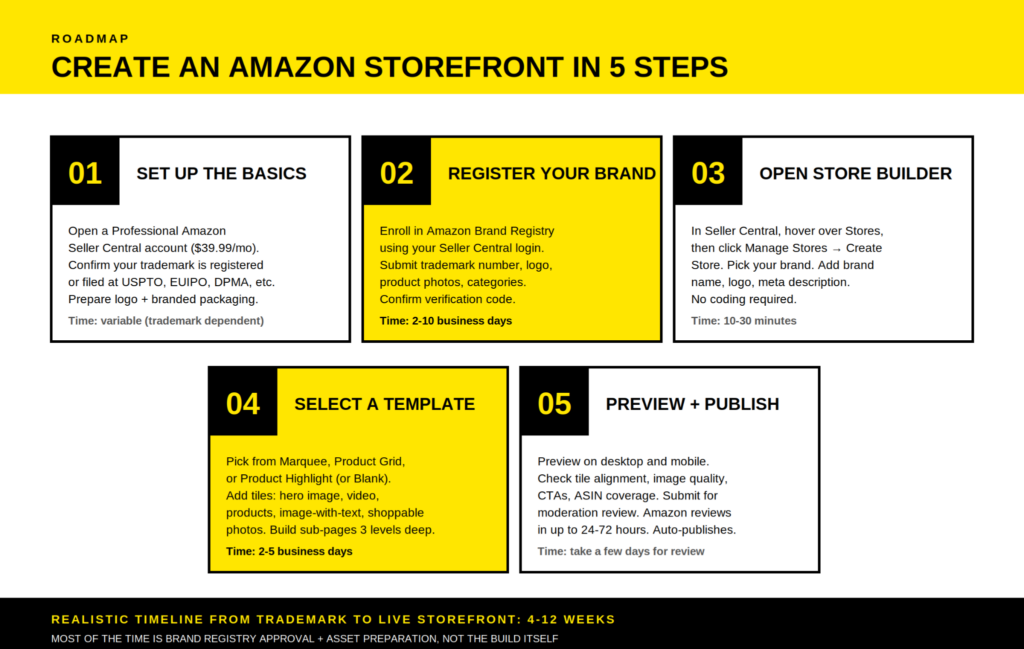
Step 1: Set up the foundation
Before you can open an Amazon storefront, three things need to be in place: your Professional seller account, your trademark documentation, and your branded creative assets. Skipping this preparation is the single biggest reason new sellers spend twice as long building their store as they planned.
Confirm your seller account is on the Professional selling plan inside Amazon Seller Central, under Settings and Account Info. If you are still on Individual, upgrade now. Cross-check the Account Health page. Any open policy violations or suspensions will block Brand Registry verification later.
Verify that your tax information, banking, and legal entity match the trademark holder exactly. Mismatches between a seller account in one company name and a trademark in another are a top reason Brand Registry applications get held up for weeks.
If Germany is your priority market, get your legal and operational basics in order before you start the storefront build. This guide on how to enter the German e-commerce market covers the broader market setup that Amazon sellers often underestimate.
Pull together your trademark documentation: registration certificate or filing receipt, trademark number, issuing office, list of classes covered, and a clean image of the trademark exactly as it appears on the registry.
Then prepare your brand assets. You will need a transparent-background PNG of your logo, photos of your physical products with the logo permanently affixed, and a list of the product categories you plan to sell. No stickers. No temporary labels. No “we will update the packaging later.” Amazon wants evidence that the brand exists on the actual product or packaging.
Once those basics are settled, gather the creative assets your storefront will use. Prepare hero banner images at a recommended size of 3,000 x 600 pixels, lifestyle photography in 1080p or higher, ideally 1920 x 1080 for video, branded product shots, and your brand story copy.
Most storefront builds stall here. The Store Builder takes a few hours to operate. Sourcing a coherent visual identity and high-quality images takes weeks.
For brands selling physical products in Germany, packaging is not just a creative asset. It can also become a compliance issue. Before your first major Amazon.de launch, check the German Packaging Act and the wider EU Packaging and Packaging Waste Regulation so your storefront does not promise a polished brand experience while the operational setup lags behind.
Step 2: Register your brand in Amazon Brand Registry
Amazon Brand Registry is the gate to nearly every brand-building tool on the platform: A+ Content, Sponsored Brands, Brand Analytics, Vine, and the Brand Store itself. Enrollment is free, but the documentation requirements are strict.
To register your brand, sign in at brandregistry.amazon.com using the same credentials as your Seller Central account. Click “Enroll a new brand” and walk through the form.
You will provide your brand name, which must match the trademark exactly, the trademark number and issuing office, your logo image, photos of your branded product or packaging, the product categories you plan to sell in, and the countries where you have trademark protection.
After submission, Amazon sends a verification code to the trademark correspondent listed in the IP office’s public database. This is typically the attorney or contact who filed the trademark. You must reply with that code within 10 days, or the case is closed and you start over.
This is where applications most commonly fail, because the contact in the IP database is sometimes outdated or unreachable. Coordinate access in advance.
Approval typically takes 2-10 business days when documentation aligns cleanly, though some cases can take up to three weeks if Amazon flags discrepancies. Once approved, the Brand Registry dashboard activates and a fresh tab, Stores, appears in your Seller Central navigation.
From the spring 2026 update onward, Amazon also requires Brand Registry enrollment for using manufacturer UPC barcodes with FBA shipments. That makes registration operationally relevant beyond just storefront access.
Amazon keeps tightening seller obligations, too. If your catalog falls into categories with additional product safety or documentation rules, check Amazon’s new seller obligations before you build a storefront around products that later face listing suppression.
Step 3: Open the Store Builder and start creating an Amazon storefront
With Brand Registry approved, log into your Amazon Seller Central account, hover over the Stores menu, and click Manage Stores. From there, click Create Store, select your brand from the dropdown, and you are inside the Store Builder.
The Store Builder is Amazon’s free, drag-and-drop interface for designing storefronts without coding. Brands selling on Shopify will recognize the modular feel: pre-designed templates, content tiles, and a live-preview canvas. Amazon’s builder uses its own proprietary tile system rather than supporting Shopify themes or imported HTML.
The first screen asks for your store homepage details: brand name, brand logo, and a meta description that will appear in Google’s search results when shoppers search for your brand externally.
Treat this meta description as basic SEO. Write it for humans first, but include your brand name and a one-sentence value proposition. It is one of the few storefront elements that can earn external traffic.
Storefront data also depends on clean product information. If titles, descriptions, images, and feeds are messy across marketplaces, your storefront will inherit those weaknesses. This is why accurate product data for e-commerce success matters before you worry about the final design.
Step 4: Select a template that fits your product range
Amazon offers three primary templates plus a Blank canvas option, and each fits a different kind of catalog. Picking the wrong template is not fatal. The builder allows switching templates mid-design, though extensive customization may not transfer cleanly between layouts. Still, starting with the right one saves rework.
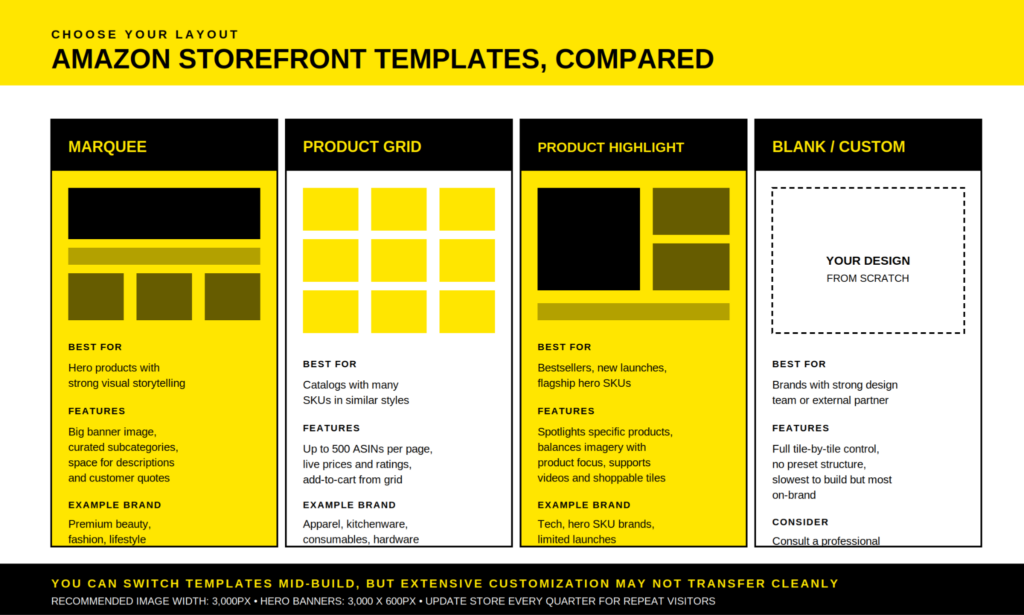
- Marquee is built around a single hero product or hero collection, with a large banner image dominating the page and curated subcategories below. It works for premium beauty, fashion, lifestyle brands, and any catalog where the brand story carries equal weight to the products.
- Product Grid displays products in a structured grid, supports up to 500 ASINs per page, and pulls live prices, ratings, and add-to-cart functionality directly into each tile. It suits apparel, kitchenware, consumables, and any catalog with many similar SKUs.
- Product Highlight spotlights specific bestsellers or new launches, balancing imagery with product focus. It is the typical pick for brands with a flagship hero SKU and a smaller supporting catalog.
- Blank gives full tile-by-tile control with no preset structure. It is slower to build, but it is the right choice if you have a strong design team or are working with an external partner.
| Template | Best for | Key feature | Time to build |
| Marquee | Hero products, brand storytelling | Full-width banner plus curated subcategories | 2-3 days |
| Product Grid | Large catalogs, similar SKUs | Up to 500 ASINs per page with live data | 1-2 days |
| Product Highlight | Bestsellers, new launches | Spotlight specific products with imagery | Around 2 days |
| Blank | Custom design, agency builds | Full control, no preset structure | 4-7 days |
Once you pick a template, you start adding tiles inside the layout. The tile system is what gives Amazon storefronts their flexibility.
Hero images span the full width of the page and set the visual tone. Use lifestyle photography that shows products in real-world context, not white-background catalog shots.
Image-with-text tiles combine visuals with messaging and are useful for value propositions, brand story moments, and category introductions.
Product grids and product tiles automatically populate with your live product data: image, title, price, and star rating. Shoppers can add items directly to cart without leaving your storefront.
Background videos auto-play and loop silently as page backgrounds, while featured product widgets and recommended-product widgets pull dynamically from your catalog and the shopper’s purchase history.
You can also build sub-pages, up to three navigation levels deep, for product categories, collections by use case, “About us” pages, or seasonal landing pages. Each page has its own template, title, and meta description. The Store Builder generates the navigation menu automatically based on your page structure, which means descriptive page titles directly shape how shoppers move through your store.
A practical note on mobile: more than 60% of Amazon traffic comes from mobile devices, and the Store Builder lets you toggle between desktop and mobile previews as you design. Use it.
Tiles that look balanced on desktop can feel cramped on a phone screen, and split sections often produce excessive scrolling on mobile. Large featured images and videos display most consistently across screen sizes. Text-heavy tiles often break.
This is also where broader ecommerce behavior matters. In Germany, shopping journeys increasingly stretch across marketplaces, social apps, retail media, and search. The future of e-commerce in Germany is becoming more visual and more mobile, so your Amazon storefront cannot look like a static catalog from 2016.
Worth knowing: the Amazon Seller mobile app lets you make light edits and check store insights from your phone. You can update featured products or schedule a versioned page from anywhere, which is useful when you spot a stockout in the middle of a campaign.
Step 5: Add product listings, write copy, and preview
Once your layout is in place, populate it with your products. Inside the Store Builder, use the Product Grid or Product Tile widgets and search for your ASINs by product name, ASIN, or category. Drag the chosen products onto your page, arrange them in order, and Amazon will automatically populate the live image, title, price, and star rating for each tile.
Two rules matter here.
First, products must already be live on Amazon to appear in your storefront. Listings under suppression, out-of-stock SKUs, or products you intend to oversell on but have not yet launched will not show.
Second, every product on your storefront pulls live data from its product detail page. That means your storefront only looks as good as the underlying product listings. Title, image quality, A+ Content, and customer reviews all carry into how shoppers perceive your brand inside the storefront.
If you are unsure which products deserve homepage placement, look at category demand and margin before aesthetics. This overview of top product categories in German e-commerce gives useful market context for product-led storefront planning.
Use clear CTAs throughout. “Shop Now,” “Discover the Range,” and “See What’s New” work because they are short, action-oriented, and easy to understand. Position your primary CTA before the first scroll, then repeat it after testimonials, benefit lists, or product demos wherever a visitor might feel ready to act.
Color contrast matters more than design philosophy. A bold CTA button against a clean background outperforms a beautifully matched palette that nobody notices.
For SEO purposes, treat each storefront page like a small website page. Add relevant keywords to page titles, product descriptions, and image alt text. The meta description on each page can surface in Google’s search results, so well-written meta descriptions can drive external organic traffic to your storefront. It is a small but real channel that most sellers ignore entirely.
Before submitting, preview your storefront on both desktop and mobile inside the builder. Walk through every page, click every product tile, and watch every video. Check that nothing is broken, nothing oversells what your inventory and pricing can deliver, and that customer reviews on linked product pages are healthy enough to support the visit.
If the storefront looks good but the underlying listings have low ratings or missing images, the storefront amplifies the weakness. Fix the listings first, then publish the storefront.
When everything looks right, click Submit for publishing. Amazon’s moderation review can take a few days, typically 24-72 hours, sometimes up to a week if changes are requested. If approved, your storefront goes live automatically at amazon.com/your-brand or amazon.de/your-brand depending on marketplace.
If changes are requested, Amazon flags the specific issues, and you fix and resubmit. Common rejection reasons include incorrect image dimensions, broken or non-clickable elements, misleading interactive tiles, content that violates Amazon’s creative guidelines, claims about competitors, prices in imagery, contact details, and external links.
Step 6: Promote your storefront and drive traffic
A live storefront earns nothing on its own. Amazon does not push shoppers to brand stores through organic search the way it pushes them to product detail pages. Brand stores require deliberate promotion, and brands that treat the storefront as a destination, not just a brochure, see meaningfully better store performance.
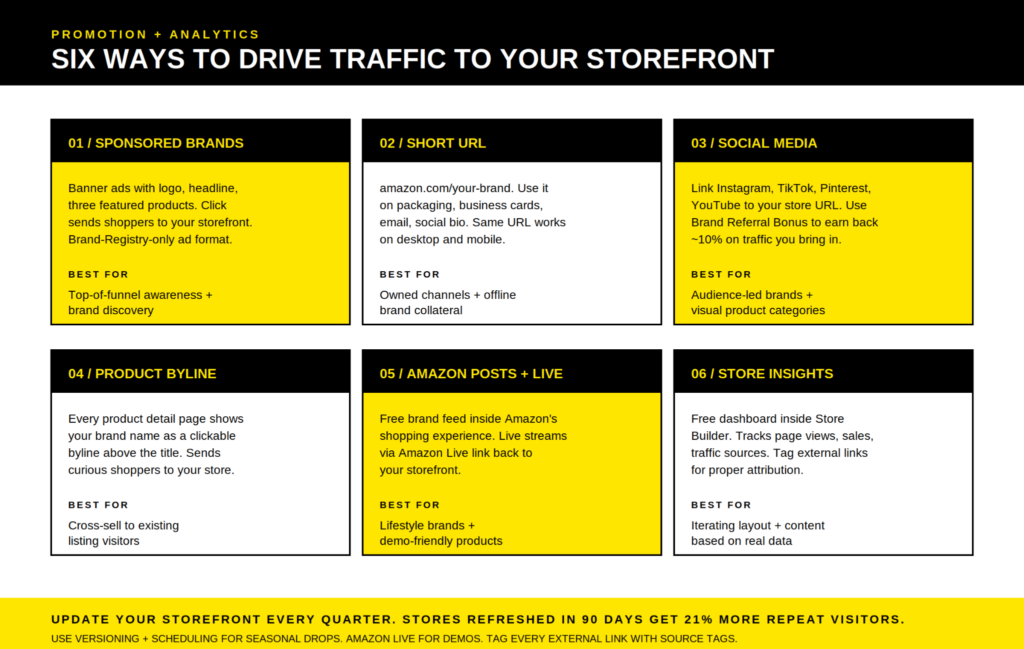
The most powerful in-Amazon promotion is Sponsored Brands ads. These banner-format ads appear at the top of search results, feature your logo, a custom headline, and three products, and drive clicks straight to your storefront rather than a single product listing.
Sponsored Brands are gated to Brand Registry sellers only, so if you are reading this guide, you already qualify. New-to-brand metrics inside Sponsored Brands campaigns help you measure which keywords are actually driving brand discovery versus hitting existing customers.
If you need a wider paid media baseline, this breakdown of whether Amazon Sponsored Ads are still worth it is useful, especially if you are deciding how much launch budget should go toward storefront traffic.
Campaign structure matters too. A strong storefront can still underperform if ads send the wrong traffic to the wrong page. Before scaling spend, review the principles behind campaign structure for Amazon Ads and basic Amazon PPC optimisation.
Your brand byline on every product detail page is a free traffic source most sellers overlook. The brand name above each product title is clickable and sends shoppers to your storefront. Make sure your brand name on listings matches the storefront name exactly, because that is the byline shoppers see.
Outside Amazon, your short URL is the asset to deploy everywhere. Put it on packaging inserts, business cards, at the bottom of every email, in your social media bios, and on retail signage. The same URL works on desktop and mobile, and traffic that comes through it may qualify for the Amazon Brand Referral Bonus, which rewards sellers for bringing external traffic into Amazon.
That bonus exists because Amazon wants you investing in promotion and is willing to share some of the upside.
Social media is the channel where storefronts most directly compete with the Amazon Influencer Program. Brands with their own social audience should link the Amazon storefront in Instagram, TikTok, and Pinterest bios, in YouTube descriptions, and across shopping apps in Germany where their audience already shops. Tag external links with source tags so you can attribute traffic correctly inside Store Insights.
For storefront-heavy launches, Sponsored Brands custom images can make a visible difference. This older but still useful guide on better Amazon Ads shows why creative choices inside Sponsored Brands matter, especially on mobile.
Amazon Posts is a free, organic content feed inside the Amazon shopping experience. Think Instagram-style brand updates that appear in shopping feeds and on related product detail pages. It is criminally underused.
Amazon Live lets brand-registered sellers stream live shopping events directly inside Amazon, with the storefront as a natural landing page for viewers.
Retail media also deserves attention here. Amazon storefront promotion does not live in a vacuum. It sits inside a wider media ecosystem where brands compete for attention across marketplaces, search, and retailer-owned placements. This article on retail media and channel noise gives useful context for why your storefront needs a traffic plan, not just a clean design.
Finally, Store Insights, the free analytics dashboard inside Store Builder, tracks page views, sales, traffic sources, and engagement by page. Use it to identify which pages convert and which need work. A storefront that is never measured is a storefront that never improves.
Maintain and iterate: the part most brands skip
The single highest-ROI activity for a live Amazon storefront is updating it. Amazon’s internal data shows stores updated within the last 90 days see 21% more repeat visitors. Yet most brand stores sit unchanged for 6-12 months because the team that built it has moved on to other things.
A simple maintenance cadence works. Every quarter, update the hero banner, swap in seasonal product collections, refresh the lifestyle photography, and revise CTAs based on what is actually selling.
Use the Versioning & Scheduling feature inside Store Builder to design seasonal versions of your storefront in advance and schedule them to go live automatically. This is useful for Black Friday, Prime Day, holiday campaigns, or product launches. The same feature works in reverse: version your store for a campaign, then automatically revert to the evergreen layout when the campaign ends.
Storefronts also work better when they connect with your broader channel strategy. If Amazon, Shopify, social, and retail marketplaces all tell different stories, shoppers notice. A stronger omnichannel strategy for ecommerce helps keep brand messaging, promotions, and product positioning consistent across every touchpoint.
For sellers active across multiple Amazon marketplaces, say Amazon.de plus Amazon.it and Amazon.fr, Amazon’s multi-country expansion tool inside Store Builder replicates and translates your storefront to other marketplaces in a few clicks. It is not perfect. Manual review of translations is essential, especially for German, but it dramatically reduces the work of maintaining a Pan-European brand presence on Amazon across every country where your products are available.
Building one presence on Amazon and replicating it across marketplaces is significantly easier than maintaining separate brand assets per country. For any growing brand on Amazon, this scales well as your catalog expands.
If European expansion is part of the plan, Amazon’s Export Central is also worth understanding. Storefronts help shape the brand experience, but expansion tools decide how far that experience can travel.
Common mistakes when creating an Amazon storefront
After helping brands across the DACH region launch storefronts, four mistakes show up over and over.
Building the storefront before the listings are right
A storefront amplifies your product listings. If listings have weak photos, missing A+ Content, low review counts, unclear titles, or messy product data, the storefront makes the weakness more visible, not less.
Fix listings first.
Ignoring mobile
Designers who build on a desktop monitor and do not preview mobile end up with stores that look polished on a 27-inch screen and unreadable on a phone.
Toggle to mobile preview every few minutes, not at the end.
Treating the storefront as a brochure
A static storefront converts worse than no storefront at all because it signals a brand that has stopped paying attention.
Update quarterly at minimum. Seasonal products, new launches, refreshed banners, and better-performing CTAs should all make their way into the store.
Confusing the Brand Store with the Amazon Influencer Program storefront
Brand owners sometimes apply to the Amazon Influencer Program thinking it is the route to a Brand Store. It is not. It is a separate affiliate program for content creators.
Brand owners go through Brand Registry. Influencers go through the Influencer Program. The two paths do not connect.

Tooling that helps you build and grow your storefront
Two categories of tools come up repeatedly when sellers build and optimize Amazon storefronts.
For product research and ASIN selection, meaning deciding which products belong on the storefront homepage versus deeper category pages, Helium 10 and Jungle Scout are the dominant tools. Helium 10 in particular offers a free trial that covers most of what new storefront builders need: keyword research, listing analysis, and competitor benchmarking.
Jungle Scout’s Product Database helps you spot which of your existing SKUs have the strongest sales velocity and review counts, which usually maps directly to which products should be featured on your homepage.
For storefront design and creative assets, brands have three options: build entirely in-house with the Store Builder’s drag-and-drop tools, hire an Amazon-certified design partner, or use a Shopify-style design as the visual blueprint and translate it into Store Builder tiles manually.
The first option is free but slower. The second often costs €2,000-€8,000 for a full multi-page build. The third works well when you already have a strong DTC store and need to adapt the visual hierarchy to Amazon’s constraints.
Note that Amazon’s builder cannot directly import Shopify themes. The tile dimensions and technical constraints differ. Still, the visual hierarchy of a strong Shopify store usually translates well into Amazon’s modular system.
If you are unsure which path to take and the storefront is mission-critical to your launch, consult a professional rather than building it twice.
Where an Amazon storefront fits in your wider marketplace strategy
An Amazon storefront is not a replacement for your ecommerce strategy. It is one part of it.
Amazon gives you demand, trust, checkout convenience, and logistics depth. Your own store gives you customer data, email capture, brand control, and margin flexibility. Other marketplaces give you reach across shoppers who may not default to Amazon in every category.
That is why storefront planning should start with the question: what role should Amazon play in this brand’s channel mix?
For some brands, Amazon is the primary sales engine. For others, it is a trust channel, especially when customers discover the brand elsewhere but prefer to buy through Amazon. For cross-border sellers, it can act as a low-friction entry point into Germany before a full local ecommerce operation.
If expansion beyond Germany is on the roadmap, keep an eye on wider cross-border ecommerce trends. A storefront can help standardize brand presentation, but fulfillment, tax, content localization, marketplace fit, and customer expectations still decide how well the expansion performs.
The storefront is the room you control inside Amazon’s house. It is not the whole house.
Key takeaways
- An Amazon storefront is a free, multi-page brand destination on Amazon, available only to brand-registered sellers.
- Brand Stores for brands selling their own products are completely different from Amazon influencer storefronts for content creators using affiliate links.
- To create an Amazon storefront, you need a Professional Seller account, an active Amazon Brand Registry enrollment, and a registered or pending trademark.
- Brand Registry approval takes 2-10 business days when documentation aligns. The trademark itself can take 6-12 months if you do not already have one.
- Inside Seller Central, the Store Builder is a no-code, drag-and-drop interface with three main templates: Marquee, Product Grid, and Product Highlight. A Blank canvas is also available.
- Mobile traffic is now a major share of Amazon’s audience. Preview every page on desktop and mobile before submitting it for review.
- Amazon’s review of a submitted storefront can take a few days, typically 24-72 hours.
- Promote your storefront through Sponsored Brands ads, the brand byline, your short URL, social channels, Amazon Posts, and Amazon Live.
- Store Insights gives you free analytics on traffic sources, page views, sales, and engagement. Use it to iterate.
- Update your storefront at least quarterly. Stores refreshed within 90 days see more repeat visitors.
Conclusion
A well-built Amazon storefront is the closest thing a third-party seller has to owning real estate on Amazon. It costs nothing to build, takes a few weeks from idea to live page, and gives your brand its own URL, navigation, and shopping experience without a single competitor ad on the page.
The build itself is the easy part.
The discipline that separates storefronts that drive sales from storefronts that collect dust is the work before and after: getting Brand Registry approved cleanly, fixing the underlying listings, designing for mobile first, promoting the store deliberately, and updating it every quarter so returning shoppers see something new.
Treat your storefront as a real channel rather than a one-time setup, and it will reward the attention.
FAQ
Do I need a registered trademark to create an Amazon storefront?
Yes, in nearly every case. Amazon Brand Registry is the gate to creating an Amazon storefront, and Brand Registry requires either a registered trademark or a pending trademark application from a supported IP office. The IP Accelerator program can give you faster access to Brand Registry while your trademark is pending, but it does not skip the trademark requirement entirely.
How long does it take to create an Amazon storefront from scratch?
The build itself takes a few hours to a few days. The realistic end-to-end timeline depends on what you already have. If you own a registered trademark and Brand Registry is approved, building a multi-page storefront takes 2-5 business days, plus 24-72 hours for Amazon’s review. If you do not yet own a trademark, add 6-12 months for trademark registration. The build is rarely the bottleneck.
Is the Amazon storefront the same as the Amazon Influencer Program?
No. A Brand Store is for brand owners selling their own products and requires Brand Registry. The Amazon Influencer Program is for content creators who curate and recommend other people’s products and earn commissions through an affiliate link model. Both are called storefronts, but they use different eligibility rules, different URLs, and different revenue mechanics.
Can I create an Amazon storefront without using FBA?
Yes. The storefront sits on top of your product listings regardless of how those listings are fulfilled. You can create an Amazon storefront whether you use FBA, FBM, or a mix of both. The storefront simply pulls your existing ASINs and displays them with your branding.
For logistics context, especially if you sell across the UK, Germany, or wider Europe, this explainer on FBA and FBM logistics models is worth reading.
How much does it cost to create an Amazon storefront?
The storefront itself is free for any Brand Registry seller. The underlying costs are the Professional Seller account at $39.99 per month, trademark registration if you do not have one, and optional creative or agency fees if you outsource the design. There is no separate subscription or per-page fee for the storefront.
Will an Amazon storefront improve my product listings’ SEO inside Amazon search?
Indirectly. The storefront itself does not directly rank in Amazon’s A9 search algorithm, but several factors connected to the storefront affect search visibility. Sponsored Brands campaigns running to the storefront drive engagement signals to your listings. The brand byline drives traffic across products. Meta descriptions on storefront pages can also earn external Google traffic, some of which converts into branded Amazon searches.
The combined effect can lift listing visibility, even if the storefront page itself is not the ranking driver.
Can I update my Amazon storefront after it goes live?
Yes, anytime. Edits go through the same review process as the original submission, typically taking 24-72 hours per change. The Versioning & Scheduling feature lets you design future versions in advance and schedule them to go live automatically. This is useful for seasonal launches, holiday campaigns, and product drops.
What if my Amazon storefront submission gets rejected?
Amazon flags the specific issues during moderation review, and you fix and resubmit. Common rejection reasons include incorrect image dimensions, non-clickable or misleading tiles, claims about competitors, prices in imagery, contact details, and external links. None of these are permanent failures. Fixing the flagged issues and resubmitting almost always results in approval.